Wednesday, September 25, 2019

Poor man's PoE for Raspberry pi-3/4 under ~$2


Warning: This blog is about powering your raspberry pi-3/4 over ethernet cable(length upto 100Meters), It uses Passive PoE mechanism where T568b wire colors are.. 
Blue/Blue-White         ==> +(positive) terminal of DC supply
Brown-White/Brown  ==> -(negetive) terminal of DC supply

If you dont know what is a passive PoE, then dont proceed!!!, instead buy a proper PoE Hat for Raspberry pi-3.

If you are a tinkerer/hw-enthusiest/diy-hobbyist(and you know what you are doing), here is what you need,

1)PoE Injector cable(costs less than 80cents)


2)DC-DC buck converter from aliexpress that costs less than 50cents(Look for Hesai brand, 12v-24v input and 5V/3A Output).


3)female-to-female jumper wire(cut into 4 pieces) and solder as shown in the picture


4)Cover DC-DC converter in a heatshrink sleev, and connect to raspi-3 as shown.

5)Feed 12v-DC and  Network-connection to the PoE Injector and connect CAT-5 cable(upto 100m) between Injector cable and Raspberry-Pi-3 as shown below


Saturday, August 24, 2019

A5-V11 : Overwrite OEM(qualcomm) firmware with Openwrt Image

Here are few steps to overwrite OEM firmware of a5-v11 router with openwrt.

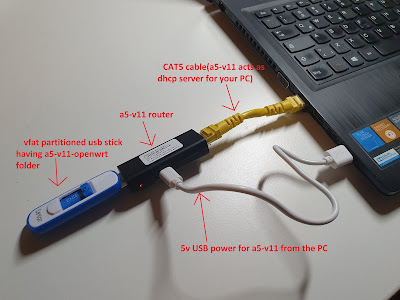
1) Prepare a FAT formatted USB-Flash-Drive and unzip this a5-v11-openwrt.zip to USB-Flash-Drive. (Important: do not just copy a5-v11-openwrt.zip to flash-drive, unzip this file to USB-Flash-Drive, this folder contains openwrt-factory.bin with needed boot-loader and update scripts)

2) Prepare this setup as shown in the picture below.


3) After appying +5v power to a5-v11, RED-LED on this router stays ON for few seconds, and then BLUE-LED starts blinking (from power-ON to blinking-blue-led-state, it takes about 1minute)

4) By this time, your PC would get the ip in the range of 192.168.100.x from the a5-v11's dhcp server.

5) Ensure that your a5-v11 has qualcomm firmware by looking at the web-UI of this router.


NOTE: Do not continue incase if your router's web-page is different than the one shown above(Qualcomm), you might have received another variant having chinese firmware, Instructions for overwriting the chinese firmware are given in my other blog.

6) telnet to the a5-v11 using putty.exe(or telnet command) as shown below.
6) Run the following commands as shown in the picture below7) After rebooot, wait for a minute, this time, openwrt firmware would boot on a5-v11, and your PC would get the ip in the range of 192.168.1.x8)If everything goes well, your browser would show the following webUI of openwrt.
9) As shown above, follow step-1 and 2 to login with default root user.10) After login you will see following page,
11) you can overwrite openwrt firmware with your own openwrt-variant by clicking on menu system=>Backup/Flash Firmware as shown in the picture above.Have Fun hacking your a5-v11 with opensource firmware!!!


Thursday, January 03, 2019

Wifi based DIY 5V switcher for led-lights


There are so called "USB Fairy Lights" or "USB String Lights" can be purchased from china for less than 3$ for a 10m/100Led set.


These are 5V USB powered and weather-proof(except the USB connector part). I was curious to know more about these lights, and had a detailed look, this is what i found,


and a closup of the LED,


5V powered 100LED circuit was consuming around ~1.8Watts(though 5.1Ohm series resistor was really hot) and the brightness of the LED's were not bad, especially difference between first led and last led brightness didnt bother me it was hardly noticeable when seen from distance. So I decided to use them as a christmas decoration for my garden.

I wanted to use them with battery-bank as there was no power-outlet readily available(for the safety of my children, i would avoid any 230v circuit in my garden especially in wet weather).
Also I wanted them to be switchable remotely to avoid going out in the freezing cold. Hence this is what i came up with.. an "ESP-12F based USB-5V switcher"


Although It works as intended, but with tasmota firmware, due to missing deep-sleep feature, i need frequent battery charging(every few days). Larger battery bank and ESP-8266 deepsleep would make this setup work for weeks before battery needs recharge.

Incase if you want to build this 5v switcher, here are some details,


Note: Before starting the assembly, ensure that the ESP-12F module is pre-programmed with tasmota or any other firmware that supports OTA. For the first time programming of ESP-12F module, here is my blog explaining the details of ESP-12F module programming.

Items Needed:


Assembly Step-1:


Assembly Step-2:

Assembly Step-3:

Assembly Step-4:

Assembly Step-5:


Assembly Step-6:


Assembly Step-7:


Assembly Step-8:

Assembly Step-9:


Final Assembly: 


Let me know in comments sections if you have suggestions or improvements. Hope you find this low-cost DIY project useful.


Tuesday, January 01, 2019

20$ Pocket router as Domoticz Home Automation Gateway


TLDR; I built a openwrt based custom firmware(autom8box), that packs router_functionality+domoticz_server+mqtt_broker which is all-in-one home-automation-gateway-solution running on a cheap $20 router that can be purchased off-the-shelf. 

Wifi based home automation products are cheaper compared to zigbee or z-wave products, but the downside is, wifi devices need internet connection to perform their function. Letting your home devices controlled by a bunch of cloud servers on the internet may not be the best idea.

Internet connectivity for home devices should be optional - user should be incharge of deciding whether he/she wants to expose the home-devices to internet(may be for remote monitoring/controlling purpose), but in today's world, there are so called "alexa"/"google-home" compliant wifi devices who insist on internet else they wont work.

Thanks to the opensource community(tasmota/espurna/etc) for helping us to jailbreak those wifi devices like sonoff/blitzwolf/teckin/etc.. but jailbreaking solves part of the problem, still the need for a home-automation gateway is a challenge and requires some advanced knowledge of setting-up wifi_access_point + mqtt_broker + automation_gateway_server(ex: domoticz/openHab).

To address this gateway problem in a simplest and cheapest way, here is my attempt to convert an existing Off-the-shelf cheap wifi-router into a full-automation-gateway to support following functionalities.

  • wifi-access-point
  • dhcp and dns server
  • mqtt broker(mosquitto)
  • domoticz
GL-MT300Nv2 is a ~$20 device which supports opensource firmware like openwrt. All I did was to build my own variant of openwrt firmware that includes all necessary components like domoticz and mqtt-broker.


Downside of using this device as an automation-gateway is the limited-wifi-range and limited set of domoticz plugins(because of 16MB flash limit). But its a good start if you want to start playing with home-automation on low-budget.

Ok, lets get started, follow these steps to overwrite OEM firmware with autom8box on GL-MT300N-v2 hardware.

1) Download the autom8box binary from here.
2) Power ON your GL-MT300N-V2 box and wait for device's ssid to show up on you PC.
3) with OEM firmware, this device's ssid is shown as "GL-MT300N-V2-xxx"


4) Go ahead and "Connect", when a password window shows up, enter "goodlife" (this info is also printed on the backside sticker of GL-MT300N-v2)


5) If everything goes well, you will see the following message on your windows PC.


6) Open a browser, and enter following address in the URL field:
http://192.168.8.1/cgi-bin/luci/admin/system/flashops


7) As shown above, leave the password box empty and click on "Login" button. Next window will take you to firmware update section as shown below.


8) As shown above, uncheck "Keep settings box" and choose the file(autom8box-mt300nv2.bin) which was downloaded from a link given in step-1.


9) Click on "Flash Image" button and wait for next window to show up and click on the "Proceed" button.


10) Next window you will see as follows, wait for about 2minutes.


11) After 2minutes, check on your Pc's wifi-list, new ssid "autom8box"  will show up


12) when connected, password request will show up, again "goodlife" is the password.


13) If everything goes well, then your PC will get the ip address in the range of 192.168.8.x

14) open the following URL in the  browser - there you go! your new shiny domoticz UI
http://192.168.8.1:8080


 From here onwards i assume you know how to add and configure the devices on domoticz. But as part of initial setup, here are some important steps i recommend to secure your home-devices-network.

Q: What are the ssh login details?
A: user: root and pw: goodlife

Q: How to change the root password?
A: using ssh, login to the box and run the following command
         "passwd root" when asked, enter the new password

Q: How do i change the ssid key?
A: using ssh, login to the box and run the following command
         "uci set wireless.default_radio0.key=my-new-ssid-key-here;uci commit wireless;wifi"

Q: How do i change the ssid?
A: using ssh, login to the box and run the following command
         "uci set wireless.default_radio0.ssid=my-new-ssid-here;uci commit wireless;wifi"

Q: I dont trust your binary, can i build the image from sources? is it opensource?
A: As of today, my openwrt build scripts are not organized well, but you can try to build the image yourself and let me know if you face any problem. Sources and buildscripts are all opensource on github, here you will find the build instructions.


Important Note:
As of now, autom8box doesnt support automatic saving of domoticz database, for the moment, after adding all your domoticz devices, you need to ssh login and run manual "reboot" command, during reboot domoticz databased is saved from ram to persistant partition - if you do hard-power-cut your previously configured devices on domoticz may get lost - i plan to fix this in future.